Picture a plain bead charm swinging just right on your necklace. That smooth dangle comes from one small detail: a perfect simple loop. You bend wire into a clean circle at the top. It holds the charm secure without extra wraps.
Beginners love this technique because it’s fast and strong for everyday pieces. No fancy skills needed. You get pro results quick. In this guide, you’ll find tools, steps, fixes for slip-ups, and pro tips. By the end, you’ll craft loops that look shop-made. Let’s grab your pliers and start.
Gather the Right Tools and Materials for Easy Success
You need basic items to form tight loops every time. Start with 20 to 26 gauge dead soft wire. Copper works great for practice. Switch to sterling silver for your final charms. Softer wire bends easy but holds shape well.
Pick round nose pliers with graduated jaws. They make loops the same size each time because thinner tips create smaller circles. Chain nose pliers help grip and close. Flush cutters give clean ends without burrs. A thin marker or 1-3mm mandrel sizes loops right.
Optional tools speed things up. Bail making pliers have steps for exact loops. A rubber mallet flattens and hardens wire. Always wear safety glasses. Wire snaps can fly.
Local bead shops stock these, or order online. For example, check Rio Grande’s wire guide for gauge tips.
Print this shopping list to stay organized:
| Item | Recommended Gauge/Size | Why It Matters |
|---|---|---|
| Dead soft wire | 20-26 gauge | Bends smooth, holds shape |
| Round nose pliers | Graduated jaws | Forms perfect round loops |
| Chain nose pliers | Fine tips | Grips and snugs tight |
| Flush cutters | Precision | Clean cuts, no rough edges |
| Mandrel or marker | 1-3mm | Matches loop to chain size |
| Safety glasses | Clear lens | Protects eyes from wire snaps |
This setup costs under $50. You reuse them for years.

Follow These Steps to Form Your Perfect Simple Loop
Practice on scrap wire first. You master this in 10 tries. Decide loop size to match your chain or jump ring. Small for earrings, bigger for bracelets.
Cut wire 1-2 inches longer than your bead or charm height, plus loop space. Straighten it by pulling through cloth. Slide the charm on. Grip with round nose pliers. Bend, wrap, close, and trim. Test on a chain.
Cut and Straighten Your Wire Precisely
Measure bead height plus 1 inch for the loop and tail. Cut straight with flush cutters. File any burrs smooth. Rough ends scratch charms.
To straighten, pinch wire between cloth layers. Pull firm from end to end. Kinks ruin loops, so go slow. Straight wire bends even. As a result, your circle stays round.
Slide on Your Charm and Position It Right
Push the bead or charm up snug to the loop spot. Leave no gap. For stacked charms, use a tiny glue dot to hold in place till done.
Position balances the dangle. Hold wire vertical. The charm hangs centered. This step prevents wobbles later.
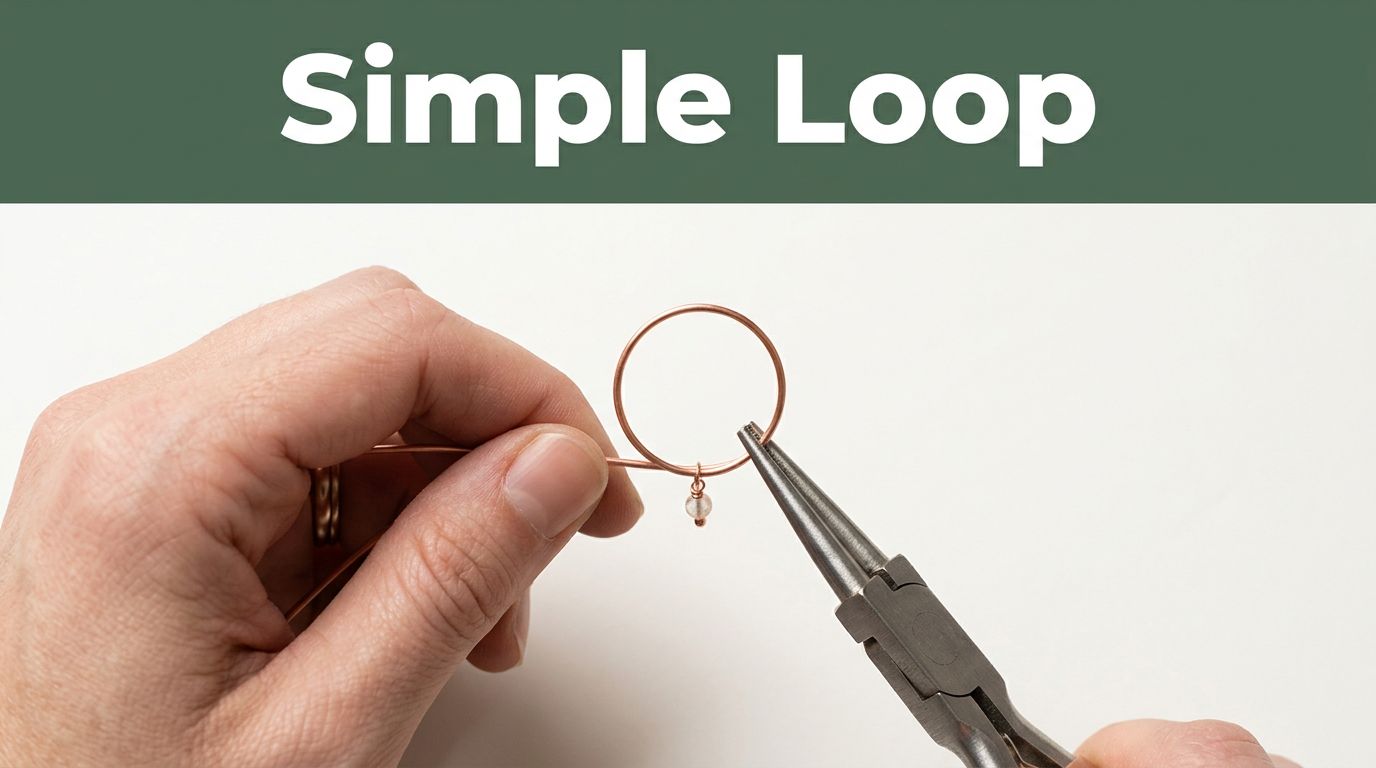
Grip with Round Nose Pliers for the Perfect Start
Hold wire parallel to plier jaws. Grip 1/8 inch above the charm with the round nose tip. Smallest jaw makes tiny loops.
Bend wire 90 degrees away from you. Keep steady. Use your thumb for control. The wire hugs the jaw tight. Smooth bends avoid flats.

Wrap Around to Shape the Round Loop
Slide pliers out halfway. Reposition so the wire end points up inside the half-loop.
Bend down firm to cross the main wire stem. Make it tight. No gaps yet. Both hands help. One holds pliers, the other guides wire. Over-bending opens it up, so stop when snug.
Snug It Closed and Trim for a Clean Finish
Switch to chain nose pliers. Pinch the loop perpendicular to the stem. Press tight against the charm top.
Trim excess tail close with flush cutters at a slight angle. Press the cut end flat into the loop. Hang on a chain to test. It spins free but stays shut.
For more visuals, see Beadaholique’s loop demo video.
Spot and Fix Common Mistakes for Loops That Last
Everyone messes up at first. Oval shapes happen from uneven bends. Loose ones snag chains. Wrong sizes don’t fit.
Spot issues early. Fix with plier tweaks. Prevention beats redo. Dull tools cause most problems. Sharpen or replace them.
Why Your Loops Come Out Oval and How to Round Them
Uneven pressure or wrong jaw size twists them. Use the same jaw spot each time.
Practice on a mandrel. Slide the loop over. Tap gentle with a mallet. Both hands control bends even. Consistent pressure rounds them perfect.
Gaps or Loose Loops That Snag Chains
You skip the final pinch. Loops stay open.
Chain nose fixes it. Grip across the gap. Squeeze till wires touch. For stubborn ones, add a tiny wrap, but keep simple. Test by tugging.
Loops Too Big or Small for Your Charms
Chain size mismatches. Tiny loops slip off big rings.
Mark plier jaws with tape for repeats. Or wrap around mandrel first. Match to your jump ring. See Interweave’s sizing chart for quick reference.

Extra Tips to Make Your Charm Loops Look Store-Bought
Hammer loops light with a rubber mallet. It work-hardens wire so they hold better. Tumble finish in a polish kit for shine.
Stick to plier notches for matching sizes. All charms look uniform. Use loops for earrings, bracelets, even keychains.
For heavy charms, make double loops. Twist two wires together first. Experiment with colored copper or gold-filled wire.
Try variations like eye pins for beads. Link to full projects next. Share your first loop photo in the comments. What charm will you loop up?

Your charms now feature secure, pretty loops you made in minutes. No more floppy dangles or gaps. Grab scrap wire today. Turn odds and ends into treasures.
Pin this for your bench. Share your makes below. Subscribe for more quick jewelry fixes. Your next perfect loop waits.