Beads scatter across the floor again. You spent hours stringing that perfect bracelet, but the temporary knot fails, or glue leaves a sticky mess. Frustrating, right? Crimp tubes fix this problem fast. They create a clean, strong hold without knots or adhesives. Your bracelet gets a professional finish that lasts.
You can do this in under 30 minutes, even as a beginner. No special skills needed. We’ll cover everything: supplies to grab, exact steps for both ends, and tips to avoid slips. In the end, you’ll wear a bracelet that looks store-bought. Let’s turn your beaded strand into wearable art.
Gather the Right Tools and Materials Before You Begin
Start with the basics. Flexible beading wire forms the backbone. Choose 0.018 to 0.024 inch gauge. It handles most beads without kinking. If you restring, get 10 to 20 feet for one bracelet.
Crimp tubes secure everything. Pick 2x2mm seamless ones. They match thin wire and slide smoothly. Buy extras; you need two per bracelet.
Clasps come next. Lobster claw works for easy open-close. Toggle suits bold styles. Magnetic options snap on quick. Get one pair that fits your design.
Crimping pliers make the magic. Look for two-notch types. The first notch folds; the second squeezes round. Chain-nose pliers help with loops. Wire cutters trim clean.
Here’s a quick list of what you need for one bracelet:
- Beading wire: 49-strand for flexibility (10 feet).
- Crimp tubes: 10 silver or gold seamless (size 2x2mm).
- Clasp set: Lobster or toggle (match bead color).
- Crimping pliers: Double-notch for secure folds.
- Chain-nose pliers: For fine adjustments.
- Wire cutters: Flush-cut style to avoid frayed ends.
Each tool has a job. Crimps grip without damaging wire. Pliers fold them tight. Cutters leave short stubs. Match sizes first. Too big a crimp slips; too small breaks wire.
Shop at craft stores or online. Starter kits save money. They bundle wire, crimps, and pliers for $15 to $25. Test wire strength by bending it. It should flex, not snap.
Prep your workspace. Lay down a bead mat to catch spills. Have scissors for tape nearby. Now you’re set to crimp.
Master the Step-by-Step Process to Attach Your Clasp
Both ends get the same treatment. Work symmetrically for even tension. Handle beads gently. They chip if you rush. Wear eye protection when cutting wire. Small bits fly.
Follow these steps in order. Check after each crimp. A good one holds with a satisfying click.
Slide a Crimp Tube onto One End of Your Beaded Strand
Finish stringing your beads first. Leave 2 to 3 inches of wire tail at each end. This gives room to loop.
Slide one crimp tube onto the tail. Push it close to the first bead. It sits snug, but not tight. If beads slip off, wrap tape around the end. It acts like a temporary stopper.
Seamless crimps look best. They hide inside beads for a smooth finish. Size matters here. Match to your wire gauge. Test on scrap wire first. Pull hard; it should stay put.
Now the wire waits for the clasp.
Thread the Wire Through the Clasp and Loop Back
Choose one clasp half. Start with the ring or bar side. Thread the wire end through its loop.
Pull until the crimp tube rests against the clasp. Leave a tiny bit of slack. This forms a small loop later.
Loop the wire straight back. Pass it through the same crimp tube hole. Tug gently. The clasp sits secure on its loop. Do not pull too hard. Beads shift and stress.
Check the loop size. It should hold the clasp without wobbling. Adjust by sliding the crimp if needed. Keep tails even on both sides.
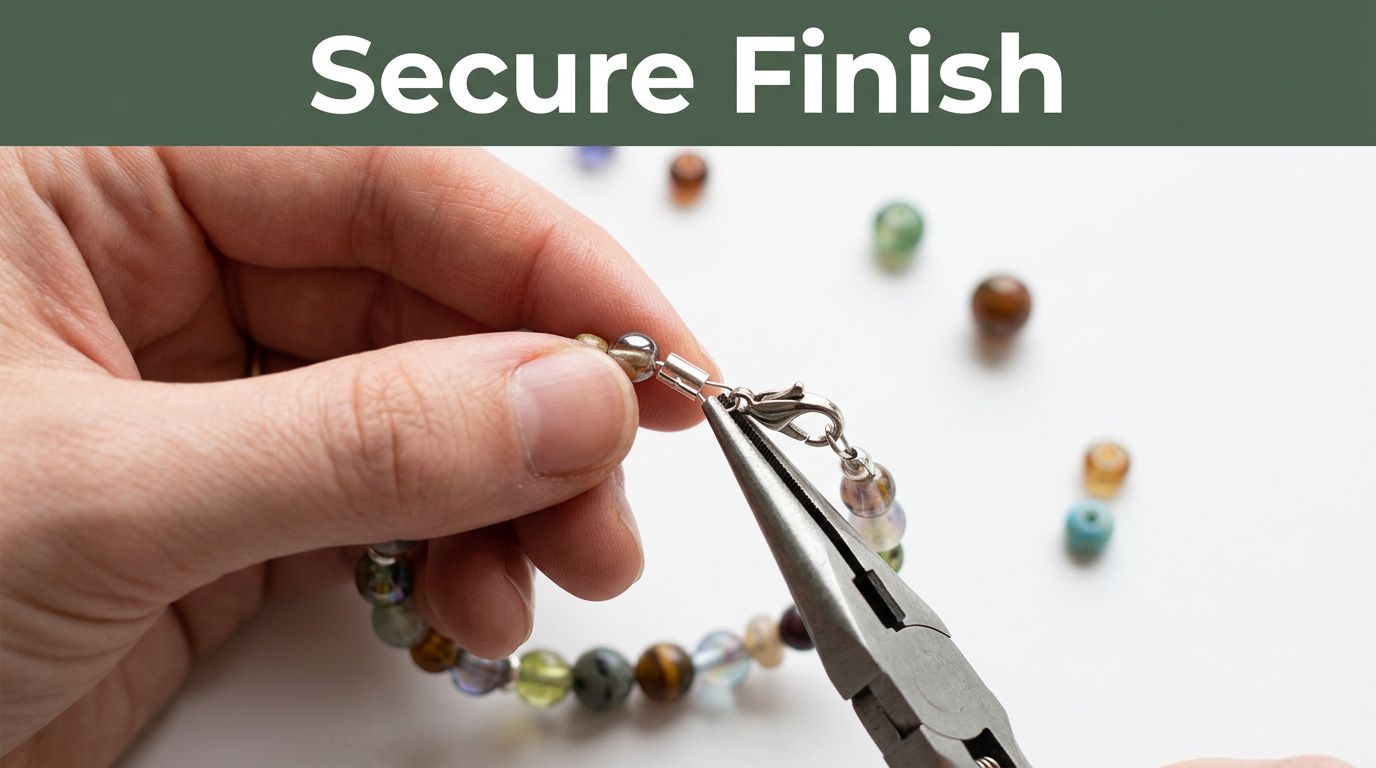
Secure the Crimp with Pliers for a Rock-Solid Hold
Place the crimp in the first plier notch. That’s the fold jaw. Squeeze firm. It bends into a U shape.
Move to the second notch. The round jaw. Squeeze again. Wings fold over each other. The crimp looks like a tiny barrel now.
Tug the clasp. It stays put if done right. A bad crimp moves side to side. Redo it then.
For extra polish, slide on a crimp cover. It hides the fold. Crimp over it lightly. Your end sparkles.
Repeat checks. Wiggle the wire. No give means success.
Repeat on the Other End and Trim Excess Wire
Do the full process on the second side. Use the matching clasp half.
Lay the bracelet flat. Adjust bead spacing. Pull tails to even tension. Beads sit straight.
Cut wire 1/4 inch from the crimp. Flush cutters make clean ends. Tuck the stub into a nearby bead hole with chain-nose pliers. It stays hidden.
Clasp it shut. Slip on your wrist. Twist and pull. It holds through daily wear.
Test the full piece. Open and close 10 times. Beads stay spaced. You’ve got a keeper.
Avoid Mistakes and Elevate Your Bracelet with Expert Tips
Crimps slip if you skip sizes. Practice on scrap saves beads. Dull pliers cause weak holds. Sharpen or replace them.
Tension matters too. Too loose, and beads clack. Too tight, and wire snaps.
Fix Loose Crimps and Check for Secure Attachment
Pull the clasp after crimping. Any movement means redo. Cut off the bad crimp. Slide on a new one.
Dull pliers slip. Feel the notch edges. Smooth ones grip best. Prevention beats fixes.
Inspect under light. Good crimps show folded wings. No gaps.
Get the Perfect Fit with Tension and Sizing Tricks
Measure your wrist. Add 1/2 inch for comfort. Drape the strand over your hand during steps. Adjust beads as you go.
Slide crimps last. This lets you tweak spacing. Wear-test before trimming. Pull ends to snug it up.
Fun Upgrades Like Covers and Extender Chains
Crimp covers add shine. They snap over folds like tiny beads.
Add an extender chain. Loop 1 to 2 inches on one end. It fits any wrist.
Hang charms from the clasp ring. They dangle just right. Match metals for pro looks.
Try multi-strands. Crimp three wires together. It builds thickness.
These tweaks turn good into great.
Your bracelet now clasps secure with crimp tubes. Simple tools deliver pro results. No more spills or weak knots.
Grab your supplies and string one today. Snap a photo when done. Share in the comments below. What clasp style will you pick first? Pin this for your next project. More jewelry DIYs coming soon. Your custom accessory starts now.