Picture this. You bead a stunning multi-strand necklace over hours. Each strand sparkles with gemstones and pearls. Then the ends look bulky and amateur. Frustration hits hard.
A clean finish changes everything. It gives your design a professional polish that rivals store-bought pieces. Wearers love the comfort. Strands stay secure without fraying. Best of all, beginners can master it fast.
We’ll walk through the simplest method using crimp cones and multi-strand clasps. First, gather supplies. Next, follow step-by-step instructions. Then, avoid common pitfalls. Finally, try fun variations. Get ready to elevate your jewelry game.
Stock Up on These Must-Have Supplies for a Pro Finish
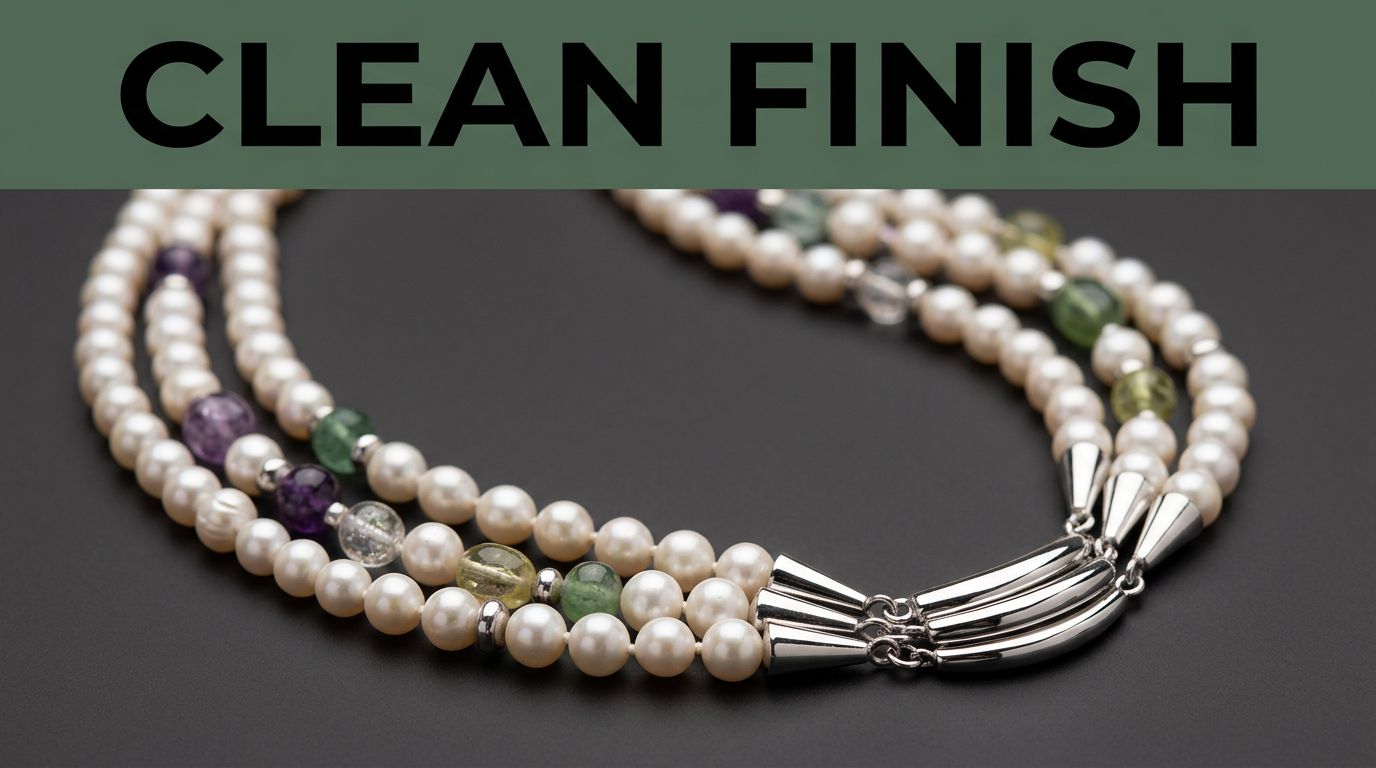
You need the right tools for smooth results. Start with a multi-strand clasp. Pick a box or barrel style with 3 to 5 loops. It holds strands neatly. Match the metal to your beads, like gold-tone for warm colors.
Crimp cones come next. Choose 10-15mm sizes. They taper strands into the clasp. Hide ugly crimps inside. Get crimp tubes or beads too. They secure wire ends.
Grab crimp pliers. They flatten and round crimps fast. Wire cutters trim excess cleanly. Add wire guardians or bullion. These protect strands from clasp wear.
For a standard 18-inch necklace, buy one clasp set, 10-12 crimp cones, matching crimps, and pliers if you lack them. Shop multi-strand box clasps on Amazon for quick delivery. Or check craft stores like Michaels.
Here’s a quick shopping list:
- Multi-strand clasp (3-5 loops): 1 pair
- Crimp cones (match bead size): 10-12
- Crimp tubes (2mm): 20+
- Crimp pliers: 1 pair
- Wire cutters: 1 pair
- Wire guardians (optional): 10-12
Match everything to your design’s metal and scale. This keeps the look cohesive. Spend under $20 for basics.

Master the Step-by-Step Process for Flawless Ends
This method bundles strands neatly. It creates a tapered end. Results look pro every time. Follow these numbered steps closely.
- Bead all strands first. Leave 3 inches extra wire per end.
- Lay strands side by side. Check lengths.
- Add guardians if using. Thread wires through cone.
- Loop through clasp. Crimp secure.
- Repeat on other end. Test wear.
Tension matters. Pull gently for even drape. No puckers allowed. Safety first: wear eye protection. Close crimps fully to lock.
Measure and Cut Strands to Perfect Lengths
Even lengths make necklaces drape right. Lay all strands flat on a bead board. Measure from clasp edge to clasp edge. Aim for 18 inches total per strand, plus 2-3 inches extra for finishing.
Cut beading wire carefully. Add half an inch per strand for guardians. This prevents shortages. Double-check symmetry. Uneven strands twist when worn.
For example, if your necklace hangs 17 inches, cut wires at 20 inches each. Trim later. This extra gives wiggle room.
Slide on Guardians and Thread the Cone
Protect strands from rubbing. Slide a wire guardian onto each end. The loop faces outward.
Bundle all strand ends. Pass them together through the crimp cone’s base hole. Cones come in sizes. Pick one that fits your bead diameter snugly. It tapers smoothly.
Pull wires through until the cone sits tight against beads. Strands bunch neatly now.
Loop Through Clasp and Crimp Securely
Separate strands. Loop each through a clasp ring. Pull back through the cone.
Slide a crimp tube over each wire tail. Position inside the cone. Squeeze flat with pliers. Then round it. This hides everything.
Trim excess wire close to crimps. Use cutters for clean ends. Avoid over-crimping. It damages wire.
Crimp twice if needed. First flatten, then fold in half for strength.
Check for sharp edges. File if necessary.
Finish the Other Side and Give It a Test Run
Repeat steps on the second clasp half. Match tension exactly.
Tug gently on each strand. Nothing should slip. Hang the necklace. Strands must drape even.
Wear it overnight. Spot any shifts early. Adjust crimps then.

Steer Clear of These Traps That Ruin Your Clean Look
Mistakes happen. But fixes keep designs sharp. Watch for bulky cones, loose crimps, uneven strands, visible wires, and oversized clasps.
- Mismatched cones: Bulky ends hide beads. Fix: downsize to bead scale. Test fit first.
- Loose crimps: Strands unravel fast. Double-crimp every time.
- Uneven lengths: Necklace tilts. Remeasure post-beading.
- Visible wires: They scratch skin. Trim closer; use covers.
- Wrong clasp size: Overpowers design. Scale to strand count.
Quick tweaks save pieces. Learn from errors.
Fixing Bulky or Visible Crimps
Big cones add bulk. Choose slim ones that match. Close crimps fully inside.
If visible, add crimp covers. Hammer flat for texture. Or use hammered cones for boho style.
Before: lumpy end. After: smooth taper.
Ensuring Strands Stay Even and Drape Right
Bead loosely first. Remeasure on a necklace board. Hang on a mannequin neck for preview.
Adjust by twisting wires short. This evens drape without recutting.
See Beadaholique tips on even strand draping for visuals.
Add Personal Flair with Smart Finish Variations
Keep it clean but unique. Try these twists.
Filigree cones add vintage charm. They suit boho or art deco beads. Source from Etsy sellers.
Magnetic clasps snap easy. Great for daily wear. Match to minimalist designs.
End bars work for heavy beads. They add rigid structure. Coordinate colors with beads.
Match variations to style. Boho gets ornate cones. Clean looks use plain metals. Experiment small.

The crimp cone and multi-strand clasp method delivers pro results fast. No fuss, just clean ends that showcase your beadwork.
Grab supplies today. Make one necklace this weekend. Your designs will shine like boutique finds.
Share photos of your finished pieces in the comments. What variation will you try? Pin this for later crafts.